starting rails(작성 중)
rails
rails guiding principles
- Don’t Repeat Yourself: DRY is a principle of software development which states that “Every piece of knowledge must have a single, unambiguous, authoritative representation within a system.” By not writing the same information over and over again, our code is more maintainable, more extensible, and less buggy.
- Convention Over Configuration: Rails has opinions about the best way to do many things in a web application, and defaults to this set of conventions, rather than require that you specify minutiae through endless configuration files.
rails 프로젝트 만들기.
installing rails
Rails 설치 전 준비되어야 할 리스트
- Ruby
- SQLite3
- Node.js
- Yarn
Yarn은 npm으로도 설치 가능하다.
Blog application 만들기
레일즈는 기본 디자인 패턴 프로젝트를 생성할 수 있는 명령어를 가지고 있다.
$ rails new blog
위는 blog 디렉토리를 생성하며 gem dependencies를 가지고 있다.
자동생성된 디렉토리에는 아래와 같은 디렉토리 구조를 가지고 있다.
| File/Folder | Purpose |
|---|---|
| app/ | Contains the controllers, models, views, helpers, mailers, channels, jobs, and assets for your application. You’ll focus on this folder for the remainder of this guide. |
| bin/ | Contains the rails script that starts your app and can contain other scripts you use to setup, update, deploy, or run your application. |
| config/ | Configure your application’s routes, database, and more. This is covered in more detail in Configuring Rails Applications. |
| config.ru | Rack configuration for Rack based servers used to start the application. For more information about Rack, see the Rack website. |
| db/ | Contains your current database schema, as well as the database migrations. |
| Gemfile | |
| Gemfile.lock | These files allow you to specify what gem dependencies are needed for your Rails application. These files are used by the Bundler gem. For more information about Bundler, see the Bundler website. |
| lib/ | Extended modules for your application. |
| log/ | Application log files. |
| package.json | This file allows you to specify what npm dependencies are needed for your Rails application. This file is used by Yarn. For more information about Yarn, see the Yarn website. |
| public/ | The only folder seen by the world as-is. Contains static files and compiled assets. |
| Rakefile | This file locates and loads tasks that can be run from the command line. The task definitions are defined throughout the components of Rails. Rather than changing Rakefile, you should add your own tasks by adding files to the lib/tasks directory of your application. |
| README.md | This is a brief instruction manual for your application. You should edit this file to tell others what your application does, how to set it up, and so on. |
| storage/ | Active Storage files for Disk Service. This is covered in Active Storage Overview. |
| test/ | Unit tests, fixtures, and other test apparatus. These are covered in Testing Rails Applications. |
| tmp/ | Temporary files (like cache and pid files). |
| vendor/ | A place for all third-party code. In a typical Rails application this includes vendored gems. |
| .ruby-version | This file contains the default Ruby version. |
controllers 만들기
컨트롤러의 목적은 특정 리퀘스트를 처리하기 위함이고 라우팅은 받은 리퀘스트에 대해 어떤 컨트롤러가 처리할지를 결정한다. 보통 하나의 라우터에 여러 컨트롤러가 존재하며 서로 다른 라우팅은 서로 다른 처리를 제공할 수 있다. 각각의 처리는 수집된 데이터를 뷰에게 주는 역할을 한다.
뷰는 사람이 읽을 수 있는 포맷으로 데이터를 제공한다. 여기서 알아둬야할 점은 정보가 모이는 것은 뷰가 아니라 컨트롤러라는 사실이다. 뷰는 단순히 정보를 보여주는 역할만을 한다.
아래는 새로운 컨트롤러를 생성하는 방법이다.
$ rails generate controller Welcome index
...
create  app/controllers/welcome_controller.rb
 route  get 'welcome/Index'
invoke  erb
create    app/views/welcome
create    app/views/welcome/Index.html.erb
invoke  test_unit
create    test/controllers/welcome_controller_test.rb
invoke  helper
create    app/helpers/welcome_helper.rb
invoke    test_unit
invoke  assets
invoke    scss
create      app/assets/stylesheets/welcome.scss
위 명령어를 통해 rails는 index 역할을 하는 Welcome이라는 컨트롤러를 생성했다.
뷰를 app/views/welcome/Index.html.erb에 생성한 것과
컨트롤러를 ` app/controllers/welcome_controller.rb`에 생성한 것을 확인하자
Welcome index 설정하기
config/routes.rb에서는 라우팅을 처리할 수 있다.
이때 DSL(domain-specific language)를 이용하여 라우팅 처리를 진행하는데,
공식문서에서 정확한 사용법을 확인할 수 있다.
Rails.application.routes.draw do
  get 'welcome/index'

  root 'welcome#index'
end
root 'welcome#index'는 레일즈가 http://localhost:3000요청을 Welcom conroller의 인덱스 작업에 매핑하고 get 'welcome/index'는 레일즈가 요청을 http:///localhost:3000/welcome/index에 매핑하도록 한다.
resources
리소스는 articles, people, animals 등 유사한 오브젝트의 집합에 사용되는 용어이다
리소스를 rails는 기본적인 RESTful 메서드를 제공하며 HTTP Verb와 URL을 매핑해준다.
이는 database의 CRUD 오퍼레이션과 같은 기능을 한다.
rails routes를 실핸한다면 기본적인 RESTful action 이 정의된 것을 볼 수 있을 것이다.
아래 표는 DSL 공식문서에 나와있는 resources: photos에 대한 라우팅 테이블이다.
 ;
;
CRUD 어플리케이션 예제
resources :articles를 통해 메서드는 선언되었지만 컨트롤러를 설정하지 않았다.
새로 만들어주자.
$ rails generate controller Articles
생성된 app/controllers/articles_controller.rb에서 new 기능을 정의하자.
참고로 컨트롤러는 ApplicationController를 상속받는다.
class ArticlesController < ApplicationController
  def new
  end
end
코드 작성 후 localhost:3000/articles/new에 접속 시 아래와 같은 창이 뜰 것이다.
아래 창은 Rails가 접근 가능한 템플릿 뷰가 존재하지 않을 경우 나타난다.
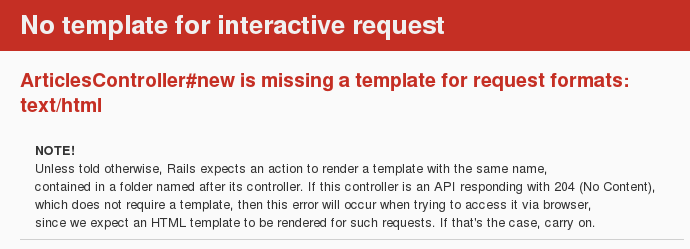
ArticlesController#new is missing a template for request formats: text/html
NOTE! Unless told otherwise, Rails expects an action to render a template with the same name, contained in a folder named after its controller. If this controller is an API responding with 204 (No Content), which does not require a template, then this error will occur when trying to access it via browser, since we expect an HTML template to be rendered for such requests. If that’s the case, carry on.
에러 멧지를 자세히 살펴보면 템플릿이 없는 것을 확인할 수 있다.
이 대 Rails는 우선 articles/new 템플릿을 찾고 존재하지 않는다면 상속받은 ApplicationController을 통해 application/new를 로드하려 한다.
웹브라우저를 통해 요청했으므로 Rails는 text/html 포맷의 응답을 기대한다.
app/views/articles/new.html.erb를 생성하자.
첫번재 확장자인 html은 format의 탬플릿이고 erb는 렌더링 핸들러의 템플릿이다.
기본적으로 ruby는 erb를 내장하고 있으며 XML과 coffee를 사용할 수 있다.
form 작성
Rails는 form_with라는 helper method를 통해 form builder를 제공한다.
<%= form_with scope: :article, local: true do |form| %>
  <p>
    <%= form.label :title %><br>
    <%= form.text_field :title %>
  </p>

  <p>
    <%= form.label :text %><br>
    <%= form.text_area :text %>
  </p>

  <p>
    <%= form.submit %>
  </p>
<% end %>
form_with를 사용할 경우 scope를 지정하는데 이는 이 폼이 무엇을 작성하기 위한 것인지 알려주는 역할을 한다.
또한, form.label 등 FormBulider object를 통해 필요한 입력 폼을 생성할 수 있다.
보통 Rails에서는 new 폼의 submttion을 create action으로 가리킨다.
여기서 주의할 점은 현재 정의된 URL을 요청 시 CRUD 동작이 이루어지는 게 아니라 그저 폼을 출력하기만 할 뿐이라는 것이다
<%= form_with scope: :article, url: article_path, local: true do |form| %>
이는 form_with의 :url 옵션을 통해 간단히 해결 가능하다. article_path는 Rails가 기존에 resources를 통해 정의된 article prefix와 연관된 URI 패턴을 폼에 가리키도록 만든다.
기본적으로는 POST로 요청한다.
articles 생성
현재 폼을 작성 후 제출 버튼을 클릭한다면 create action을 컨트롤러에서 찾을 것이다.
얼른 컨트롤러에서 create action에 대한 코드를 작성해보자.
class ArticlesController < ApplicationController
  def new
  end


  def create
    render plain: params[:article].inspect
  end
end
render 메서드는 간단히 설명하자면 키:plain,밸류:params[:article].inspect를 가지는 해쉬다.
params 메서드는 폼에서 필드 혹은 파라미터를 나타내는 오브젝트이며, ActionController::Parameters를 리턴한다.
articles 모델 생성
$ rails generate model Article title:string text:text
위 커맨드를 통해 articles 테이블에 text와 title 속성이 추가되며 Article 모델에도 자동 매핑된다.
추후 데이터베이스 생성과 관련된 것을 좀 더 깊게 알아보도록 하자.
마이그레이션 실행
Migrations은 데이터베이스를 쉽게 생성하고 수정할 수 있도록 하는 루비 클래스이다.
데이터베이스 생성 후 이를 실행취소 시킬 수도 있으며, 마이그레이션 파일 이름에는 생성된 순서대로 처리할 수 있게 타임스탬프가 포함되어 있다.
모델 생성 후 db/migrate/20200930155244_create_articles.rb이 자동생성되었으며, 내용은 아래와 같다.
class CreateArticles < ActiveRecord::Migration[6.0]
  def change
    create_table :articles do |t|
      t.string :title
      t.text :text

      t.timestamps
    end
  end
end
change메서드가 마이그레이션을 실행 시 동작하게 된다.
메서드에의해서 정의된 위 동작은 reversible 가역적이다. Rails가 이번 마이그레이션에 대해 되될릴 방법을 알고 있으며 실행되고난 후에 시점에서도 되돌릴 수 있다는 의미다.
timestamps는 생성과 수정 시기를 확인할 수 있는 column을 생성한다.
더 많은 정보는 Active Record Migration공식 문서에서 확인하자.
$ rails db:migrate
== 20200930155244 CreateArticles: migrating ===================================
-- create_table(:articles)
   -> 0.0025s
== 20200930155244 CreateArticles: migrated (0.0041s) ==========================
현재 데이터베이스는 config/database.yml에서 수정 가능하며 default모드가 Dev이므로 이 부분을 수정해주어야 한다.
컨트롤러를 통한 데이터 저장
데이터베이스를 생성했기 때문에 아래와 같이 코드를 변경 후 http://localhost:3000/articles/new 로 접속해보자.
class ArticlesController < ApplicationController
  def new
  end

  def create
    #@article is an instance variable - and is available to all methods within the class.
    @article = Article.new(params[:article]);

    #returns a boolean indicating whether the article was saved or not
    @article.save
    redirect_to@article
  end
end
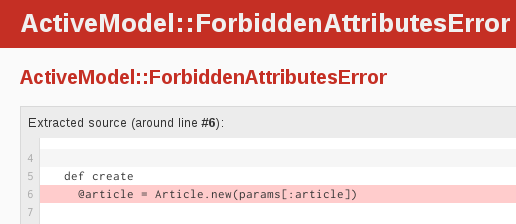
Rails는 보안을 위해 여러기능을 내장하고 있는데 이로 인해 발생한 에러이다.
Strong Parameters
Strong Parameters를 가진 Action controller는 사용이 허가될 때 까지 모델에 대한 접근 권한을 막는
속성이다. 이는 대량 업데이트를 허용할 속성을 직접 결정해야하는 것을 의미한다. 이는 유저에게 실수 혹은 고의로 모델의 민감한 접근 권한을 가질 수 없도록 하는 속성이다.
모든 컨트롤러 파라미터를 모델로 한방에 할당할 수 있는 것은 작성자에게 편의성을 가져다줄지는 모르지만 이러한 편의성이 악의적인 사용을 가능하게 한다. 악의적으로 조작된 form이 application의 무결성을 위반할 경우 모델에 치명적인 영향을 끼칠 수 있는 것이다.
컨트롤러 파라미터의 권한 설정을 통해 코드를 수정하자.
@article = Article.new(params.require(:article).permit(:title, :text))
파라미터 접근을 여러번 하는 경우 메서드 정의를 통해 아래와 같이 private 엑세스 컨트롤 설정을 통해 사용할 수 있다.
def create
  @article = Article.new(article_params)

  @article.save
  redirect_to @article
end

private
  def article_params
    params.require(:article).permit(:title, :text)
  end
Showing Articles
폼을 제출 시 아래와 같은 화면이 뜰 것이다.

$ rails routes에서 봤듯이,
article GET /articles/:id(.:format) articles#show
위에 대한 액션이 현재 필요로한 상황이다.
참고로 :id는 article의 아이디이다.
A frequent practice is to place the standard CRUD actions in each controller in the following order: index, show, new, edit, create, update and destroy. You may use any order you choose, but keep in mind that these are public methods; as mentioned earlier in this guide, they must be placed before declaring private visibility in the controller.
class ArticlesController < ApplicationController
  def show
    @article = Article.find(params[:id])
  end

  def new
  end

  # snippet for brevity
<p>
  <strong>Title:</strong>
  <%= @article.title %>
</p>

<p>
  <strong>Text:</strong>
  <%= @article.text %>
</p>
다시 폼을 제출하고 show가 렌더링 되는 것을 확인하자.
article 전부 출력
class ArticlesController < ApplicationController
  def index
    @articles = Article.all
  end
...
index.html.erb
<h1>Listing Articles</h1>

<table>
  <tr>
    <th>Title</th>
    <th>Text</th>
    <th></th>
  </tr>

  <% @articles.each do |article| %>
    <tr>
      <td><%= article.title %></td>
      <td><%= article.text %></td>
<!--      hyperlink to `Show` with article.id     -->
      <td><%= link_to 'Show', article_path(article) %></td>
    </tr>
  <% end %>
</table>
article_path 메서드에 인자로 넘겨주는 값을 주목하자.
이는 id값을 보내어 준다. 이에 대한 예제는 다음 섹션에서 자세하게 다뤄보도록 하자.
링크 삽입하기
app/views/welcome/index.html.erb을 열어
아래와 같이 수정해보도록 하자.
<h1>Hello, Rails!</h1>
<%= link_to 'My Blog', controller: 'articles' %>
link_to 메서드는 레일즈의 built-in view helpers 중 하나이다. 텍스트 기반의 하이퍼 링크를 만들며 위 경우에는 path를 articles로 설정했다.
<%= link_to 'New article', new_article_path %>
new article 뷰도 app/views/articles/index.html.erb에 링크를 넣어보자.
If you want to link to an action in the same controller, you don’t need to specify the :controller option, as Rails will use the current controller by default.
In development mode (which is what you’re working in by default), Rails reloads your application with every browser request, so there’s no need to stop and restart the web server when a change is made.
validation 추가
app/models/article.rb
class Article < ApplicationRecord
end
위 모델은 ApplicationRecord을 상속받아 생성됐다. ApplicationRecord은 ActiveRecord::Base를 부모로 가지는데, 이는 레일즈에서 CRUD 작업과 data validation, sophisticated search 등을 지원해준다
data validation을 직접 해보자.
class Article < ApplicationRecord
  validates :title, presence: true,
                    length: { minimum: 5 }
end
길이 5미만의 제목을 가질 수 없도록 설정하였다. 자세한 사용법은 Active Record Validation에서 확인하자.
def new
  @article = Article.new
end

def create
  @article = Article.new(article_params)

  if @article.save
    redirect_to @article
  else
    render 'new'
  end
end

private
  def article_params
    params.require(:article).permit(:title, :text)
  end
new action에 새로운 모델 객체를 생성하는 것을 확인하자.
저장이 되지 않을 경우 new로 렌더링 되는 것을 볼 수 있는데, 이는 기존 @article 객체를 새로운 템플릿으로 다시 보내주는 역할을 하기 때문에 컨트롤러에서 새로 생성해주어야 한다.
<%= form_with scope: :article, url: articles_path, local: true do |form| %>
  <% if @article.errors.any? %>
    <div id="error_explanation">
      <h2>
        <%= pluralize(@article.errors.count, "error") %> prohibited this article from being saved
      </h2>
      <ul>
        <% @article.errors.full_messages.each do |msg| %>
          <li><%= msg %></li>
        <% end %>
      </ul>
    </div>
  <% end %>
  <p>
    <%= form.label :title %><br>
    <%= form.text_field :title %>
  </p>

  <p>
    <%= form.label :text %><br>
    <%= form.text_area :text %>
  </p>

  <p>
    <%= form.submit %>
  </p>
<% end %>

<!--back to /articles-->
<%= link_to 'Back', articles_path %>
사용자에게 에러를 확인시켜주기 위해 위와 같은 코드로 수정하였다.
pluralize는 rails helper로써 하나의 문자열이나 숫자를 인자로 받는다. 만약 숫자가 하나 이상일 경우
자동적으로 복수형으로 출력해주는 역할을 한다.
@article이 ` @article.errors.any?에서 에러를 throw하기 위해 반드시 nil 이어야 하므로 new action에 @article = Article.new`를 추가했다.
articles 업데이트
Refernce
- https://guides.rubyonrails.org -https://kbs4674.tistory.com/158?category=876767